
Cover glass outline, corner radius and edge chips: a telecentric worked example
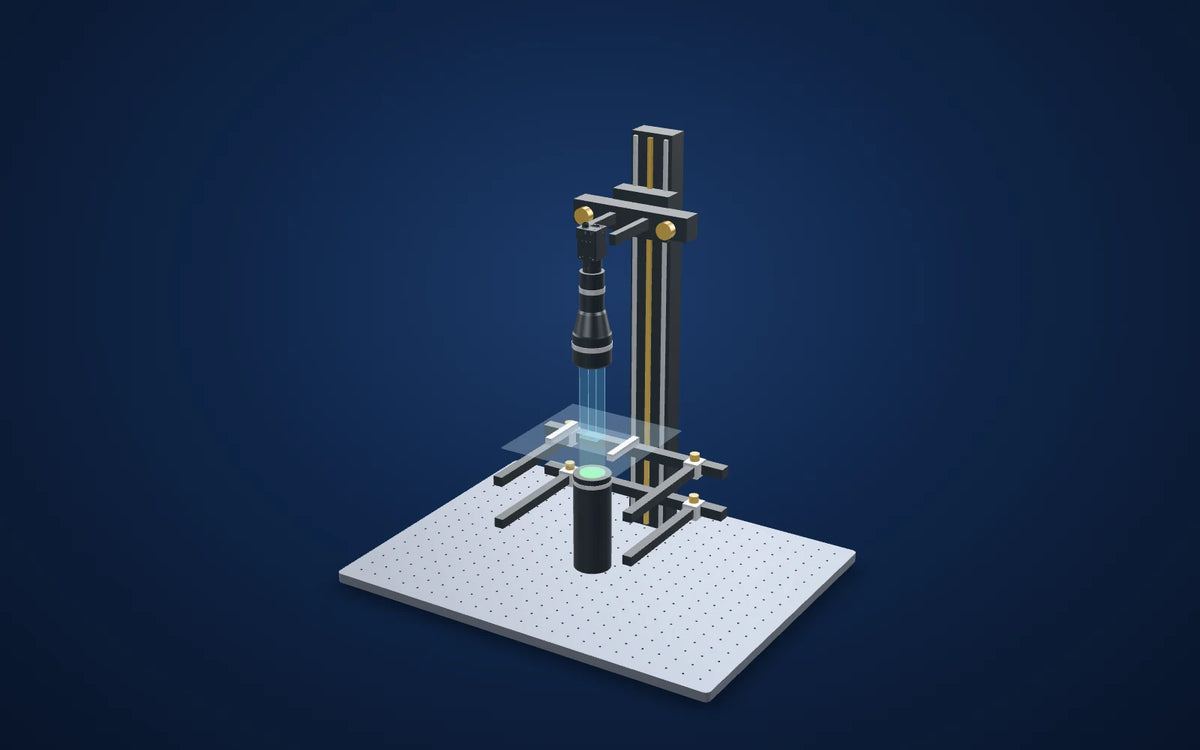
A worked example, not a customer project: a small cover glass on a 36 mm collimated backlight, imaged by a 0.317x bi-telecentric lens, shows its outline, corner radii and edge chips as a dark band on a bright field. Every number is calculated from the parts' printed rows.
Turn a transparent edge into a dark band with collimated light, then size chips against it.
- Field of view (derived)About 26.6 × 22.3 mm
- Sampling (derived)About 10.9 µm per pixel
- Working distance (lens spec)110 ± 2 mm
- Depth of field (lens spec)± 4.3 mm @ F11
Explore it in 3D

Camera CAD is the published model. Lens and light envelopes use printed dimensions. The linked station uses its published base size and column height; carriage, brackets, fittings, the part and spacing are illustrative. Confirm load, travel, fasteners and clearances before ordering. Light paths explain the arrangement and do not simulate optical performance. The part is a generic example, not a real customer part.
The challenge
Glass is transparent, so under front light its edge is a faint line among reflections from both faces. Outline, corner radius and chips along the ground edge are hard to tell apart from scratches and dust.
The edge is ground or chamfered; diffuse light entering it from the side scatters and makes the edge look narrower or wider than it is.
How it was solved
The LS-TCL-2680 prints 0.317x, 110 ± 2 mm working distance and ± 4.3 mm depth of field at F11. With the MV-CS050-10GM(NPOE) sensor of about 8.45 × 7.07 mm the field is about 26.6 × 22.3 mm, enough for a 24 × 18 mm cover glass in one image.
The LS-CLM-0067 is the lens's printed matching light: a 36 mm collimated beam, which covers the field diagonal of about 34.7 mm, and a 36-72 mm light working distance. Collimated light passes straight through the flat glass and is turned away from the lens at the ground edge and at a chip, so the edge band appears dark.
Why it works
- 1
Sampling is about 3.45 µm / 0.317 = 10.9 µm per pixel; a chip 0.1 mm deep spans about 9 pixels. The smallest chip found every time has to be set from trials with real defects.
- 2
A diffuse backlight wraps light around the edge and blurs the band; collimated light with a telecentric lens keeps the band and the outline stable.
- 3
The silhouette shows outline and edge chips. Scratches and coating defects on the faces need a separate view, for example with coaxial or low-angle light.
Worked application example (calculated, no test image)
Evidence you can inspect
No camera image is shown. This is a worked example built from catalog rows, not a test of a real part.
Nothing is reported as measured. Field, sampling and light coverage are calculated from the lens's printed magnification, working distance and depth of field, the camera's printed pixel count and pixel size, and the light's printed beam diameter.
The numbers describe what the optics sample, not a measurement uncertainty or a detection limit. Run a trial and a measurement study with real parts before relying on any tolerance.
From image contrast to a production decision
What to validate on your part
- 01
Calibrate the scale
Use a traceable glass scale or dot plate at the glass plane.
- 02
Build a defect set
Collect real chips of known size and confirm which ones the system finds every time.
- 03
Check placement
Shift and rotate the glass across the field and repeat the outline and radius measurements.
From the demo to your test bench
Parts in this setup
 Bi-telecentric lensOur pick
LS-TCL-2680
Bi-telecentric lens for 2/3" cameras, 0.317x, WD 110 mm, C-mount (LS-TCL-2680)
0.317x, 110 ± 2 mm working distance, ± 4.3 mm @ F11 depth of field and an 11.4 mm maximum sensor size, as printed.
$1,629.00
In proposed setup
 Collimated lightOur pick
LS-CLM-0067
Collimated (telecentric) illumination, beam dia. 36 mm, length 144.9 mm (LS-CLM-0067)
Printed 36 mm beam (covers the field diagonal of about 34.7 mm) and 36-72 mm light working distance. Green shown; red, blue and white versions are listed.
$579.00
In proposed setup
 CameraOur pick
MV-CS050-10GM(NPOE)
Hikrobot MV-CS050-10GM(NPOE) 5 MP GigE area scan camera, IMX264, Gen 2 basic version, Mono, Without PoE
Monochrome C-mount camera, 2448 × 2048 px of 3.45 µm (printed); its sensor diagonal of about 11.0 mm is within the lens's 11.4 mm limit.Not available in the United States. Available for delivery to other countries.
$819.00
In proposed setup
 Camera test stationOur pick
LS-MNT-0097
Camera stand with XZ adjustment and glass tray, height 600 mm, 600 x 450 mm base (LS-MNT-0097)
600 mm column, 600 × 450 mm breadboard, XZ adjustment, glass tray and two lighting holders as listed. Proposed bench fixture; confirm loads, travel and camera/lens clamps.
$1,309.00
In proposed setup
"Tested" marks the part the manufacturer used in its application test. "Our pick" is our proposed alternative or supporting part, not tested by the manufacturer in this set-up. Confirm colour, optics, controllers, power supplies, cables and mounting before ordering.
The set-up
| Lens | LS-TCL-2680 · bi-telecentric · 0.317x · C-mount |
|---|---|
| Light | LS-CLM-0067 · collimated · 36 mm beam |
| Camera | MV-CS050-10GM(NPOE) · 2448 × 2048 px · 3.45 µm |
| Working distance | 110 ± 2 mm (lens spec) |
| Field of view (derived) | About 26.6 × 22.3 mm: 2448 × 2048 px × 3.45 µm / 0.317x |
| Mounting (proposed) | LS-MNT-0097 · camera test station with glass tray and two lighting holders |
Mount the optics with intent
The station is an optical test bench, with its two lighting holders included in the catalog listing. The 3D column and base follow the published height and footprint. Carriages, clamps and part supports are schematic: confirm camera screw pattern, lens support, light fasteners, permissible load and actual travel before ordering.
Complete the electrical system
This collimated light prints DC 3 V with 350 mA operating current at 1 W and 750 mA at 3 W (1000 mA maximum): it needs a constant-current driver set to those values. Confirm current, colour, connector and power before selecting a controller; a general 24 V voltage controller is not a substitute. Camera cables and PC are separate selections.
Build this system
Start from this setup, adapt it to your part.
The configurator opens with this study's camera, lens, light and station picked. Swap any part, check fit and price, then buy or ask for a quote.
Camera CAD is the published model. Lens and light envelopes use printed dimensions. The linked station uses its published base size and column height; carriage, brackets, fittings, the part and spacing are illustrative. Confirm load, travel, fasteners and clearances before ordering. Light paths explain the arrangement and do not simulate optical performance. The part is a generic example, not a real customer part.
Glass, displays and optics
Related case studies

 Glass, displays and optics
Cover-glass ink border in IR
Image both edges sharply, then calibrate before reporting a distance.Light in sourceLS-RNG-0341 · 940 nmExplore the study

 Glass, displays and optics
Three line-light trials on display glass
Choose a lighting direction on your screen before comparing light output.Proposed light housing (spec)220 × 53 × 121.5 mmExplore the study

 Glass, displays and optics
Grid spacing on a glass cover plate
Clear stripes support measurement only after the edge rule and scale are proven.Proposed light housing (spec)74 × 50 × 50 mmExplore the study
Make the next trial specific.
Tell us the part size, smallest defect or tolerance, available working distance, material and line speed. Include what a good part and a reject look like.
Worked application example (calculated, no test image): No camera image is shown. This is a worked example built from catalog rows, not a test of a real part. The numbers describe what the optics sample, not a measurement uncertainty or a detection limit. Run a trial and a measurement study with real parts before relying on any tolerance.